Wednesday, April 25, 2012

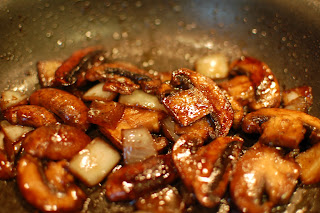
Balsamic Mushrooms

It's funny how as you get older your taste buds change. It's why I am constantly trying things again and again even if I didn't like them before. I used to hate mushrooms with a passion and now I can't get enough of them!
This recipe comes to you thanks to my parents. They always made these mushrooms and onions anytime they made grilled steak. It is fantastic on top of a filet mignon but it is equally as good as a side dish especially for a vegetarian meal. Today I am showing you how to make them stove top but I usually make them in the oven. This time stove top was much easier so I'll probably try that more often from now on. 
Ingredients:
- Any mushrooms, sliced thick. (My parents always used big portabella mushrooms. I use cremini.) 
- Half an onion, sliced
- 1T butter
- S&P 
- EVOO
-Balsamic Vinegar

Directions:
- Add the mushrooms and onions to the pan over med-high heat with pad of butter and a bit of EVOO. Saute.


When mushrooms start to get soft, add a splash of balsamic vinegar (remember you can always add more but you can't take away any!)


- Let simmer until mushrooms are cooked. Add a splash or so of water if mushrooms start to burn.
- Season liberally with pepper and a tad bit of salt.


Served here with Spinach Potato Cakes

Potato Spinach Cakes


I am so excited to post this new recipe because it is 100% mine - meaning that I came up with the idea and the ingredients on my own and the best part? They were delicious! Feels pretty good ;)
I came up with these cakes because LB was going through a major "tatoe" eating spree and because my sister passed along a bunch of fresh spinach from her produce box (I so want one!) I didn't just want to saute up the spinach and it eat because I wanted LB to get in on all that goodness so I figured I could mix it with potatoes and she would dig right in. Then why not take it one step further and add some extra seasonings like onions and garlic and then brown those babies right up! 
I wasn't going to post this recipe just yet because there are a few things I would like to try out (Fresh vs frozen spinach because I don't always have fresh) and tweak (egg, no egg? more garlic?) But my mother in law caught a picture of Lily devouring these nutritious cakes and requested the recipe so I was more than happy to oblige! 

So here we go:
Ingredients
- 2 servings of box made mashed potatoes 
- 1/4 of a yellow onion, chopped
- 2 cloves garlic
- 1/2 cup parmesan cheese
- 1/4 cup panko + some for breading
- 1 bunch of spinach, chopped
(Options to try next time: 1 egg for more binding? Real mashed potatoes? More chopped onion?)

Directions:

Saute onion and garlic in EVOO until fragrant. Add chopped spinach until wilted

Prepare mashed potatoes


Combine spinach mixture with potatoes. Add parmesan cheese and panko (add more if mixture looks too wet.) Season with S&P

Mix and taste

Make as big or as little cakes as you'd like and bread in panko. Place into a hot non stick pan with canola oil (I had to add more oil as I flipped.) 

Flip when browned. Place on paper towel when done and serve !

Crispy and creamy! Served here with balsamic mushrooms 

LB ate a whole cake plus a bit more - spinach and all! YUM!

Tuesday, April 24, 2012

Comforting Vegetable Soup

Sometimes, even when I'm not sick, I crave homemade vegetable soup. I often make this for lunch time for me and LB and we both devour bowls of it. Plus we always have leftovers to freeze or eat later in the week.
I always vary the ingredients depending on what I have. There are a few staples that I always have in the soup: Potatoes, A can of tomatoes, carrots and frozen veggies like peas, lima beans and spinach. So feel free to make your own favorite version of veggie soup. Believe me, you will never eat canned veggie soup again. It is so gross and there's no reason you should subject yourself to that! Just thinking of it makes me shudder! This soup is too easy not to make. RR would call it a "chop 'n drop" soup but really all you have to chop is the carrots, potatoes and zucchini, everything else you just throw in!

First start off with boiling the ingredients that will take the longest. You can boil in water or chicken stock. I didn't have chicken stock on hand but used a cube of chicken bouillon to add some extra flavor.  Today I started with potatoes, carrots and lima beans. Not long after the boiling started I added in the whole wheat noodles that would take 7 minutes. As the noodles and such were cooking I slowly started adding more ingredients.
(I should say, this time I made the soup I used every vegetable in my house. I was craving some serious veggies!)
So I added the tomatoes, beans, frozen spinach, first then the zucchini and peas at the last minute. I also added a sprinkle of dried basil and dried oregano.

Big pot full of healthy deliciousness

My bowl

LB's bowl - she ate it all and asked for more beans this time :) 

More Pinterest Finds

Here are a few recipes I've tried from pinterest:


Starting with zucchini "tots." These actually do smell like tater tots but that's about where the similarities end. They taste a lot like small zucchini quiches (although mine had a bit too much black pepper in it! whoops!) They were still very delicious and I would love to make them as an appetizer sometime.


 Next up is "egg boats" It's like having scrambled eggs with all your favorite ingredients in a bread bowl. AMAZING. The only problem I had was that I didn't make enough. Each person should ideally get their own baguette. Either that or serve some kind of side (besides the bacon we had) with this. I used a cheese bread and it was fabulous. I added broccoli, mushrooms, and green onions. YUM!


Sunday, April 15, 2012

Chicken Pot Pie

Mmmm...nothing says "I love you" more than a homemade chicken pot pie. This is a great meal to take to a sick friend, a new mom, someone that's just moved, or just make it to show your family how much you love them! I am attempting to freeze one of mine this time around (not baked) and see how it comes out - standby, I'll let you know!
I have a few shortcuts to making homemade pot pie. I don't, and never will, make my own crusts. I buy deep dish pie shells and pie crust tops that can roll over top.
I also use rotisserie chicken when it's on sale or I happen to be short on time. That chicken is so soft and moist! But, it's not always cheap or convenient if you don't want to go out. Yesterday I made chicken salad so I just baked off two extra chicken breasts for the pot pie today. An easy way to do this is slather chicken breasts (you can do either boneless-skinless or bone-in breasts) with EVOO and S&P and cook for about 25-30 minutes at 350 until juices run clear. Make sure to let your chicken rest before slicing or placing in the fridge.
This is also one of those recipes that you can put almost anything you like into. Don't like lima beans like our family does, leave 'em out! Add onions if you like them. Add mushrooms if you feel inclined! I also change up the seasonings. This time i used a smidge of garlic powder at the end and thyme leaves for a little zing. But it's delicious without any extras, too!

Ingredients:
1 russet potato, peeled and cut into bite sized pieces
Carrots cut up in bite sized pieces
Frozen peas
Frozen lima beans
Cooked Chicken breasts, cut up into pieces
2 deep dish pie crusts
2 pie crust tops
1 box chicken stock or broth
3T butter
3T flour
Splash of milk (Another bonus for this recipe: No heavy cream!)


Directions:
Start by boiling the potatoes and carrots together. Drain when cooked.

- Make a roux! Remember that fancy word from Lemon Spaghetti? It's the exact same principle, melt the butter, add the flour and whisk at med-low heat. Turn up the heat to med-high and whisk in chicken stock. Whisk on and off until mixture comes to a boil. Add in a splash or so of milk. Season the mixture with S&P and other seasonings of your choice (good ones are thyme, garlic, rosemary, chives, etc.) Wait until mixture boils enough to thicken. If roux is too thick, add more liquid (milk or stock.)


It just so happens that this time around my mixture did not thicken up as I normally like it to so I took 1T of butter, 1T of flour and mashed them together until you could not tell which was which and plopped it into the roux and whisked my arm off! Voila! No lumps, no raw flour taste and it thickened up nicely.
You do want the mixture to be a bit looser than say...a mac n cheese mixture, since things will tighten up in the oven and keep things moist for leftovers.
Add Chicken and Vegetables, stir. 


Divide into two pies (or however much you end up making)
- Roll tops out and place on top of pie. Cut to fit and mash down with fork around the edges to seal. Cut  slices on the top to let out steam. Brush on egg wash if you desire, I happen to have lost my pastry brush so I skip this step now (it'll just help it brown more.)
- Place in oven at 350 for 35 minutes or until bubbly and brown.
- Let cool before cutting into or everything will spill out (We never wait long enough though and it's a mess when we cut into but luckily we like taste over looks!) Remember, no worries if your mixture is a bit looser than you want, it just makes for better leftovers!


We served ours up with a side salad


Lily's bowl. Chicken pot pie is one of her FAVORITES
Yum!
Though LB always thinks it needs "more tatoes!"


Thursday, April 5, 2012

Twice Baked Potatoes

I do believe this might be the first recipe that does not have garlic in it. Although, I'm sure garlic would only take these delicious potatoes to the next level -  if there is one because these potatoes are out of this world.
I have grown up on these little tubs of deliciousness. They are a bit labor intensive but I believe the more you make them, the easier they become and they are really, really worth it.
Even the leftovers are like gold in our house. One time we had a guest over that was helping clean up after dinner and he almost destroyed the whole evening by taking the plate of potatoes over to the trash. We all gasped "What do you think you're doing!? Put those down and walk away right now!" And now that we all don't live together we have to make sure to divvy up the leftovers equally. Yes, we are that obsessed with these potatoes.

Again, as you might be getting used to with my own recipes, I don't have exact measurements for anything. Mostly because this is one of those recipes that you just taste and add more until you get it right (and you will love taste testing these) and because we always make more or less potatoes depending on the occasion (and trust me, you'll want to make more than enough!)

Ingredients:
- Russet potatoes (Each potato will yield 2 servings)
- Greek Yogurt
- Sour Cream
- Cheddar Cheese (I only had "mexican" cheese in this picture, but really, any cheese works!)
- Season Salt
- Few splashes of milk if your mixture is dry
- S&P

First thing you need to do is scrub the potatoes. Some people (*ahem* Stacey) like to eat the skin of the potato which is perfectly fine as long as you've scrubbed it!
Then bake the potatoes at about 400 for an hour or until they "give" a little bit when squished (pay attention with your nose. I know mine are done when I start smelling potatoes!)
Next. Slice open the potatoes.
Now comes the heavy work. Scoop out all the potato but be careful not to break the shell - that will be your "boat" for the stuffing. (If you break them, no worries, "glue" it together with some sour cream!)
They should look like this but don't worry if you don't get as much potato off as I did - I'm telling you, you get better at it the more you do it and I've done it A LOT!

Once the potatoes are all scooped out you'll need to mash them all up.


Add in seasoning as you go. Add in sour cream and greek yogurt.
Greek yogurt is a new thing. It adds the liquid you need as well as a little bit of tang without using so much sour cream . I've also omitted butter because these don't need any with all the other flavors going on.


Add cheese. TASTE. If the mixture is dry, add in a few splashes of milk.
Re-stuff the mixture and then top with cheese. You can put these in the fridge until you're ready to bake them off if you're making ahead but I would hold off on topping the cheese until right before you put in the oven.
Bake until warmed through. I usually broil until the cheese is browned too.

These are some of Lily's favorite potatoes - she does take after me in some aspects!

Sunday, April 1, 2012

Spinach Ricotta Ravioli


I have been wanting to make my own ravioli for ages. Partly because I like to control the ingredients that goes into our bodies and premade stuff has oh-so-much sodium and unnecessary additives and partly because I wanted to see if I could do it. I should preface this by saying that I do not make my own pasta...maybe someday...(Den asked me if I had made the pasta in which I replied, "I would need a kitchen aid stand mixer with attachments to do all that, dear." *hint hint!*) 
I use to get these frozen spinach ricotta ravioli's from BJs back when we had a membership and they were so easy to heat for dinner when LB was a baby and the only thing that was easy was boiling some pasta. I wanted these ravioli's to taste similar and so I started with what I thought should go in and added more along the way. And yes, I did remember to write down the ingredients this time!

Ingredients:
- 1 package wonton wrappers (I found mine by the tofu in the produce section)
- 10oz frozen, chopped spinach. Defrosted and squeezed dry (I let mine cool so I could use my hands to wring out all the water.)
- 1 minced garlic clove
- 2 green onions, chopped
- 1 egg
- Handful shredded mozzarella cheese
- 1/2 cup parmesan cheese
- 3/4 cup ricotta cheese

I started off easy, with the main ingredients. I mixed and tasted.


Definitely needed some onion flavor and some texture with a bit of mozzarella cheese.


Perfect! I then let it sit in the fridge until it was time to boil the ravioli because I made this early in the morning. Next time I might try stuffing the pasta first and setting that in the fridge so I all have to do at dinner time is boil the raviolis. The stuffing/ sealing takes the most time out of anything. (It's still easy!)


I used a melon baller and set the mixture on one side of the square. 


Then used some water around the edges and sealed them up.


I had somehow, magically, made just enough mixture to fill every square wonton in the package. Weird. I boiled half until they floated and the pasta was translucent. A piece of advice: These raviolis were very delicate. I think next time I would use a spider colander (slotted spoon) to get them out of the water instead of just dumping them into the colander. They stuck together a bit and the wontons that folded over got stuck that way. They were still delicious, just not as "pretty."
I then took the other half (to the left) and put them in the freezer just like that until they froze. I then carefully put those into freezer bags for an easy dinner one night! woo hoo!

Now, I wasn't quite sure which sauce would be better with these. Regular ole' marinara sauce? Or a fancy little butter-parsley-lemon-garlic-totally-made-up sauce. So I tried my hand at both. Conclusion? Both were great but Den and I both really enjoyed the made up sauce because these wontons were so delicate the marinara kind of overtook the flavors. Here's how I made the "fancy" sauce (which was really easy!)


I added about 1t butter, 1t EVOO, handful of chopped parsley, half a clove of garlic and the juice of half a lemon. I heated it up until it was fragrant and then cut the heat immediately. Pour over the raviloi and enjoy! It was fantastic!


My lovely ravioli's with my lemon-parsley-garlic-evoo sauce. Heavenly! (esp served with garlic bread!) 


This is a Lily bite, she loved them and ate all 3 raviolis I had set aside for her.